Although it is generally advised to build libraries from source, we offer few different ways to obtain libSBOL.
For help configuring a client project, see Creating a Visual Studio project on Windows or Creating an XCode project on Mac OSX.
Using Binary Installers for Windows
On Windows, installation through binary installers is the simplest way to obtain libSBOL. The installer contains pre-compiled libSBOL library. Simply install it to whichever path you want and use it.
Get the latest binary installers
Using Homebrew
On MacOSX, installation via the Homebrew package manager is easiest. Install libSBOL by running the following command in terminal:
Building from Source
To build libSBOL from source, you will need:
- git for downloading the source code
- CMake for generating platform-specific build instructions
- a C++ compiler, such as MSVC, g++, clang, or MinGW
- If building on Mac or Linux, you will need to obtain Raptor RDF from a 3rd party distribution service such as Homebrew or APT (see platform-specific instructions)
- OPTIONAL: Doxygen for creating documentation
- OPTIONAL: SWIG for generating Python wrappers
All the development has been done using "default native compilers" and Visual Studio on Windows or Unix makefiles on Mac/Linux. CMake can be used to generate projects for Eclipse, MinGW, XCode, etc.
For more details on running libSBOL on Mac, check Creating an XCode project on Mac OSX. For more details on running libSBOL on Windows using Visual Studio, check Creating a Visual Studio project on Windows.
Windows
- Install git for Windows and CMake for Windows.
- Clone the repository by running the following command in git application or command console or get the stable source here: This will create a libSBOL directory with the source.git clone https://github.com/SynBioDex/libSBOL --recursive
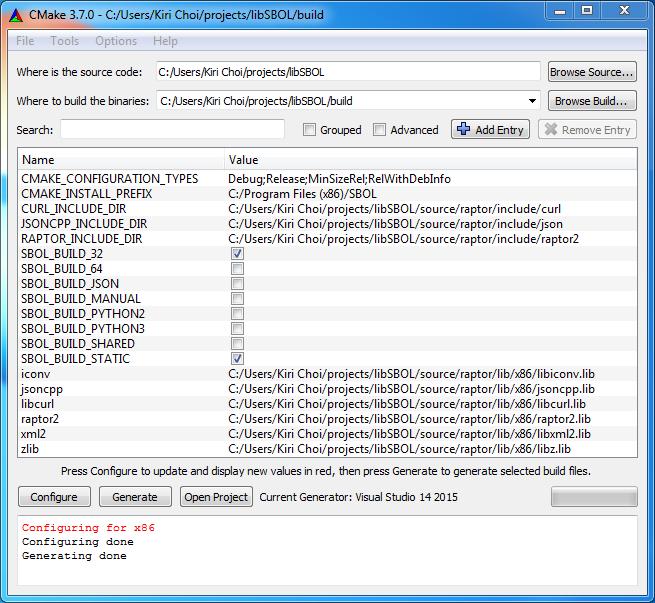
- Run CMake-gui. For "Where is the source code" enter the path to your libSBOL folder (not libSBOL/source folder). Choose build path by setting "Where to build the binaries". After setting the paths, click Configure, and choose what type of compiler you want to generate instructions for (e.g. Visual Studio 14 2015 for 32 bit and Visual Studio 14 2015 Win64 for 64 bit). See the screenshot above.
Set optional targets, e.g. examples, tests, manual, or Python wrapper. To add them check the appropriate boxes and then press Configure again. It is HIGHLY RECOMMENDED to change CMAKE_INSTALL_PREFIX from it's default path (Program Files) to somewhere else. This value determines the path the output files will be located. Building Python wrapper requires SWIG.
SBOL_BUILD_SHARED: Builds a dynamically linked library. The default is static.
SBOL_BUILD_32: Build for 32-bit architectures
SBOL_BUILD_64: Build for 64-bit architectures.
SBOL_BUILD_PYTHON2: Build SWIG-Python wrappers for Python version 2
SBOL_BUILD_PYTHON3: Build SWIG-Python wrappers for Python version 3 (not reverse compatible)
If you want to try either 32 bit or 64 bit version of libSBOL, make sure you are using the right type of compiler. (Visual Studio 14 2015 vs Visual Studio 14 2015 Win64). For Python bindings, you need SWIG and Python libraries. CMake will try to look it up for you, but if it cannot, specify the path manually.
- Once it's all set, click Generate to create the compiler instructions.
- The last step is to build the libraries. We recommend Visual Studio 2015 or minGW for this purpose. When building, make sure that you are building for 'release' target. When using Visual Studio, open 'SBOL.sln' under 'build' folder. On the Solution Explorer to the right, right click INSTALL and press Build. The library will be located under the folder you specified in CMAKE_INSTALL_PREFIX. When using minGW, first go to 'build' folder and run the compiler by using ormingw32-makeYou will need administrator privileges for a make install.mingw32-make install
- For Python bindings, copy and paste the sbol folder with Python bindings to your local Python site-packages folder.
Mac
- Install git for Mac OSX
- Clone the repository by running the following command in terminal or get the stable source here. This will create a libSBOL directory with the source.git clone https://github.com/SynBioDex/libSBOL --recursive
- LibSBOL depends on the RaptorRDF library which can be obtained using the Homebrew package manager. Install Raptor by running the following command in terminal: Homebrew isn’t the only option. Other package installers are MacPorts and Fink.brew install raptor jsoncpp libxslt curl
- Run CMake-gui (type cmake in terminal or run cmake app). For "Where is the source code" enter the path to your libSBOL folder (not libSBOL/source folder). Choose build path by setting "Where to build the binaries". After setting the paths, click Configure, and choose what type of compiler you want to generate instructions for.
Set optional targets, e.g. examples, tests, manual, or Python wrapper. To add them check the appropriate boxes and then press Configure again. CMAKE_INSTALL_PREFIX is of particular interest, since it determines the path the output will be located. By default on Mac OSX, the library will be installed to /usr/local/lib. Building Python wrapper requires SWIG.
SBOL_BUILD_SHARED: Builds a dynamically linked library. The default is static.
SBOL_BUILD_32: Build for 32-bit architectures.
SBOL_BUILD_64: Build for 64-bit architectures.
SBOL_BUILD_PYTHON2: Build SWIG-Python wrappers for Python version 2
SBOL_BUILD_PYTHON3: Build SWIG-Python wrappers for Python version 3 (not reverse compatible)
For Python bindings, you need SWIG and Python libraries. CMake will try to look it up for you, but if it cannot, specify the path manually.
- Once it's all set, click Generate to create the compiler instructions.
- In terminal, go to the build directory and run: to compile locally in the release directorymaketo compile and install to /usr/local/lib.make install
Debian/Ubuntu
- If you're on Debian/Ubuntu you can get git and cmake by running the following command in terminal. Running this command will require sudo privilege. All the other necessary dependencies can be acquired by running the following command in terminal.sudo apt-get install git cmake-qt-guisudo apt-get install build-essential libxml2-dev gcc-multilib g++-multilib libraptor2-dev libjsoncpp-dev
- If you want to generate Python wrapper you will need SWIG. To install run: sudo apt-get install swig python-dev
- Clone the repository by running the following command in terminal or get the stable source here. This will create a libSBOL directory with the source.git clone https://github.com/SynBioDex/libSBOL.git --recursive
- Run CMake-gui (type cmake-gui or cmake-qt-gui in terminal). For "Where is the source code" enter the path to your libSBOL folder (not libSBOL/source folder). Choose build path by setting "Where to build the binaries". After setting the paths, click Configure, and choose what type of compiler you want to generate instructions for. See the screenshot above.
Set optional targets, e.g. examples, tests, manual, or Python wrapper. To add them check the appropriate boxes and then press Configure again. CMAKE_INSTALL_PREFIX is of particular interest, since it determines the path the output will be located. Building Python wrapper requires SWIG.
SBOL_BUILD_SHARED: Builds a dynamically linked library. The default is static.
SBOL_BUILD_32: Build for 32-bit architectures.
SBOL_BUILD_64: Build for 64-bit architectures.
SBOL_BUILD_PYTHON2: Build SWIG-Python wrappers for Python version 2
SBOL_BUILD_PYTHON3: Build SWIG-Python wrappers for Python version 3 (not reverse compatible)
For Python bindings, you need SWIG and Python libraries. CMake will try to look it up for you, but if it cannot, specify the path manually. If you want to build against Python 3.5, you will need to install it in you local machine first. To install run:
sudo apt-get python3.5-dev- Once it's all set, click Generate to create the compiler instructions.
- The last step is to build the libraries. In terminal, first go to 'build' folder and run the compiler by using: ormake installto compile. The library will be located under the folder you specified in CMAKE_INSTALL_PREFIX.mingw32-make.exe
- For Python bindings, you might want to add the path of Python bindings as part of PYTHONPATH environment. To do so, run: export PYTHONPATH=$PYTHONPATH:/path-to-your-Python-bindings
Dependencies
LibSBOL depends on libxml2 and raptor2 libraries for I/O in XML and RDF formats. Windows releases include precompiled binaries for these dependencies libSBOL. On Mac, these libraries are typically installed by default.
Optionally, LibSBOL depends on libCurl and Jsoncpp for web integration. This is useful for features like querying biological parts in a repository or validating SBOL files. This dependency is managed by Git's submodule feature. After cloning the libSBOL project, you can clone the submodules if you wish to build it along with libSBOL:
A .gitmodules configuration file is included in the project root.